Convert a Folding Scooter into a Kid‑Friendly Cargo Carrier
Introduction
The modern commuter often owns a folding scooter for its compactness and ease of storage. One common limitation of a scooter is the lack of a dedicated cargo area for children or groceries. This guide explains how to transform a folding scooter into a safe, kid‑friendly cargo carrier without compromising the scooter’s original performance. Readers will learn practical techniques, essential tools, and safety considerations that make the conversion reliable and repeatable.
By following the instructions, one will gain confidence in attaching a sturdy basket, securing a child seat, and reinforcing the scooter frame where necessary. The approach emphasizes low‑cost, readily available components while also highlighting premium options for long‑term durability. The result is a versatile scooter that can transport a child up to 30 lb or a modest amount of cargo on daily trips. The guide remains useful even for those who choose not to purchase the recommended accessories.
What You’ll Need
- A folding scooter in good working condition.
- Adjustable mounting brackets or universal coupler compatible with the scooter’s frame.
- IblkeoTo Electric Scooter Basket – heavy‑duty metal mesh basket with 70 lb capacity.
- Optional: Schwinn Daytripper Bike Trailer for larger loads or when a child seat is not required.
- Stainless‑steel zip ties, U‑bolts, and lock‑nuts for secure attachment.
- Allen wrenches, screwdriver set, and a portable drill with appropriate bits.
- Protective padding material (foam or rubber) to cushion contact points.
- Safety harness or child‑seat belt that meets local regulations.
Step 1 – Assess the Scooter Frame and Identify Mounting Points
The first task is to examine the scooter’s tubular frame and locate sturdy sections that can bear additional weight. One should focus on the rear axle area and the vertical downtube, as these provide the greatest structural integrity. Use a ruler to measure the diameter of the tubes; this measurement determines the size of the mounting brackets required. Verify that the scooter’s folding latch remains functional after any modifications, because a compromised latch could create a safety hazard.
When the frame analysis is complete, mark the exact locations for bracket installation with a non‑permanent marker. Ensure that the marks are evenly spaced to distribute the load symmetrically. This preparation step reduces the need for trial‑and‑error during the actual attachment phase. If the scooter has a built‑in rear rack, it may serve as a natural anchor for the basket.
Step 2 – Install the Universal Mounting Brackets
Secure the mounting brackets to the pre‑marked points using stainless‑steel U‑bolts and lock‑nuts. Tighten each fastener with an Allen wrench until there is no perceptible movement. Apply a thin layer of anti‑seize lubricant to the threads to prevent future corrosion, especially if the scooter will be used in wet conditions. After installation, double‑check that the brackets are perpendicular to the frame to avoid tilting the cargo area.
At this stage, the scooter is ready to receive the basket. The brackets act as a bridge between the scooter’s frame and the basket’s attachment points, ensuring a stable connection that can handle dynamic forces while riding. If the scooter’s frame is unusually thin, consider reinforcing it with a lightweight aluminum sleeve before attaching the brackets.
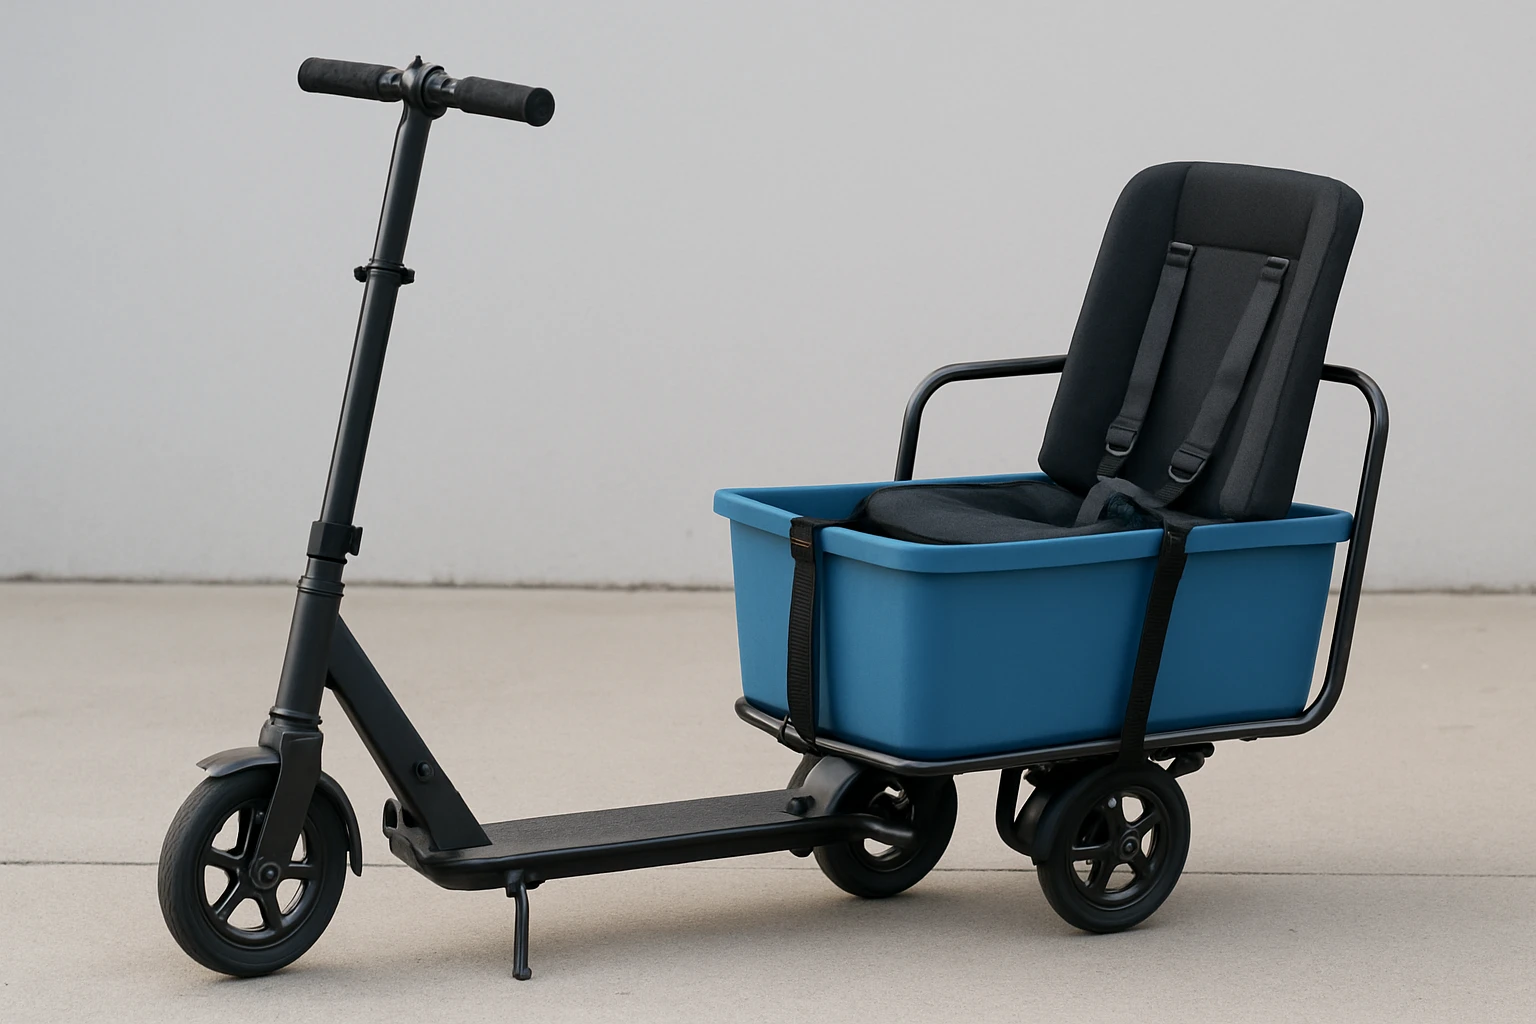
Step 3 – Attach the IblkeoTo Electric Scooter Basket
Position the IblkeoTo Electric Scooter Basket on the rear of the scooter so that its base rests evenly on the wheel axle. The basket’s upgraded metal mesh design provides a rigid container that can hold up to 70 lb without deformation, making it ideal for groceries, a small backpack, or a child seat platform. Align the basket’s pre‑drilled holes with the mounting brackets, then secure them using the supplied zip ties and additional stainless‑steel screws.
The basket’s heavy‑duty frame and multi‑layer powder‑coated finish protect it from scratches, rust, and daily wear. Its interior D‑rings can be used to strap down cargo, preventing shifting during acceleration or braking. The included bottle holder offers convenient hydration for the rider, which is especially useful on longer trips. Verify that the basket does not interfere with the scooter’s folding mechanism before proceeding.
Step 4 – Add Protective Padding and Secure the Load
Place a thin foam pad along the contact line between the basket and the scooter’s rear axle to absorb vibrations. This padding reduces noise and protects the scooter’s paint finish. Next, arrange the intended cargo inside the basket, ensuring that the total weight does not exceed 70 lb as specified by the manufacturer. Use the interior D‑rings to fasten straps around the cargo, creating a tight and stable load.
If a child will ride in the basket, install a child‑seat harness that complies with local safety standards. The harness should be anchored to the basket’s frame using the same zip‑tie method, guaranteeing that the child remains seated upright. Always test the harness by applying gentle pressure to confirm that it does not slip.
Step 5 – Optional: Integrate the Schwinn Daytripper Bike Trailer for Larger Loads
For families that require a higher cargo capacity or wish to transport a child seat that exceeds the basket’s limits, the Schwinn Daytripper Bike Trailer offers a robust alternative. This trailer holds up to 100 lb, providing ample space for a child seat, diaper bag, or multiple grocery bags. Its universal coupler attaches easily to most bicycle frames, and it can be connected to the scooter’s rear axle with a compatible adapter.
The trailer’s 16‑inch air‑filled tires deliver a smooth ride over uneven pavement, minimizing jolts that could disturb a seated child. The folding frame and quick‑release wheels allow the trailer to be stored compactly when not in use, preserving the scooter’s portability. Although the trailer adds weight, the scooter’s motor (if electric) typically compensates for the extra load, preserving range.
Step 6 – Test Ride and Adjust
Before carrying a child, perform a low‑speed test ride in an open area. Observe the scooter’s handling, paying particular attention to steering response and braking distance. If the basket or trailer causes the scooter to pull to one side, adjust the mounting brackets until the alignment is neutral. Check all fasteners after the test ride; dynamic forces can loosen connections that appeared secure during installation.
Gradually increase speed and simulate typical riding conditions such as slight uphill climbs and short stops. Ensure that the child’s harness remains snug and that the cargo does not shift. If any rattling noises are heard, tighten the zip ties or add additional padding to dampen vibration.
Tips & Pro Tips
- Use rust‑resistant stainless‑steel hardware to extend the lifespan of the attachment points, especially in humid climates.
- Apply reflective tape to the basket and trailer for increased visibility during dusk or night rides.
- Periodically inspect the basket’s mesh for signs of fatigue; replace it if any strands appear stretched.
- When using the Schwinn Daytripper Bike Trailer, engage the scooter’s regenerative braking (if available) to recover energy lost due to the added load.
- Store the scooter with the basket removed in a dry environment to prevent moisture buildup inside the metal mesh.
Troubleshooting
Problem: The basket wobbles while riding.
Solution: Verify that the mounting brackets are tightened evenly and that the foam padding is correctly positioned. Replace any worn zip ties with new stainless‑steel versions.
Problem: The scooter’s folding mechanism sticks after installation.
Solution: Ensure that no hardware protrudes into the hinge area. If necessary, relocate the brackets slightly forward or backward to maintain clearance.
Problem: The child feels insecure in the basket.
Solution: Install a dedicated child‑seat insert that fits within the basket dimensions and secure it with additional straps. Always use a certified harness.
Conclusion
Transforming a folding scooter into a kid‑friendly cargo carrier is achievable with a systematic approach and the right accessories. By assessing the frame, installing sturdy brackets, and attaching the IblkeoTo Electric Scooter Basket, one creates a reliable platform for everyday errands. For larger loads, the Schwinn Daytripper Bike Trailer extends capacity while preserving safety and comfort. Regular maintenance and periodic testing ensure that the conversion remains safe for both rider and passenger. With these steps, one can enjoy the convenience of a cargo‑capable scooter without sacrificing its compact nature.
Products Mentioned in This Guide
Frequently Asked Questions
What basic tools are needed to convert a folding scooter into a kid‑friendly cargo carrier?
You’ll need a set of adjustable mounting brackets, a drill with appropriate bits, screws or bolts, and basic hand tools like a wrench and screwdriver.
Can the conversion affect the scooter’s folding mechanism?
If brackets are installed on the frame’s non‑hinge sections, the folding function remains unchanged and safe.
What is the maximum weight a DIY cargo carrier can safely hold?
A properly reinforced carrier can support up to 30 lb, which is suitable for a small child or light groceries.
Do I need to reinforce the scooter frame before adding a basket or seat?
Yes, adding reinforcement plates or braces at the mounting points helps distribute load and prevents frame flex.
Are there any safety considerations when transporting a child on a scooter?
Always use a secure child seat with a harness, ensure the cargo is balanced, and keep speeds low to maintain stability.