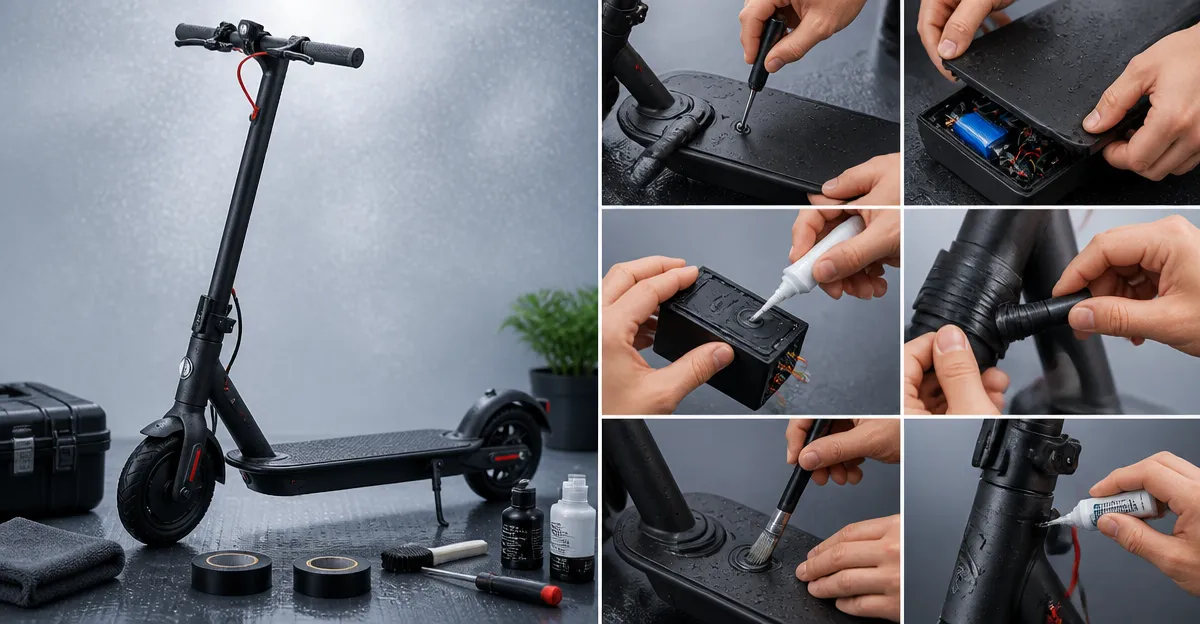
How to Waterproof Your Folding E‑Scooter: DIY Step‑by‑Step Guide
The modern commuter often relies on a folding electric scooter for rapid urban travel. Water exposure, whether from rain, puddles, or accidental splashes, can degrade components and shorten the vehicle's lifespan. This guide teaches the reader how to apply waterproofing measures using practical, cost‑effective tools while preserving the scooter's performance. By following each step, the reader will protect the motor, battery, and electronic connections, ensuring reliable operation in wet conditions.
What You Will Need
- Isopropyl‑based electrical contact cleaner
- Silicone sealant (clear, high‑temperature rating)
- Waterproofing spray for metal and plastic surfaces
- Micro‑fiber cleaning cloths
- Small brush for tight spaces
- Heat‑shrink tubing (2 mm diameter)
- Protective gloves and safety glasses
- Optional: portable charger for testing after the upgrade
These materials are readily available at hardware stores and do not require specialized expertise. The reader may already own some items, such as silicone sealant, from previous projects.
Step 1: Assess the Current Water Resistance
Before any modification, the reader should evaluate the scooter's existing protection level. Place the scooter under a gentle spray for ten seconds and observe any visible moisture ingress. The WERHY Electric Scooter features a dual‑brake system and a folding frame, yet its design does not guarantee complete sealing of hinge points. Noting where water enters will guide targeted sealing in later steps.
Step 2: Clean and Dry the Scooter Thoroughly
A clean surface ensures that sealants adhere properly. Use the electrical contact cleaner to remove dust, oil, and old adhesive from the motor housing, battery compartment, and wiring connectors. Follow with a micro‑fiber cloth to dry each area. The VOLPAM Electric Scooter is praised for its 3‑second folding mechanism; however, rapid folding can trap debris that later compromises waterproofing. A meticulous cleaning routine eliminates this risk.
Step 3: Seal Electrical Connections with Silicone and Heat‑Shrink
Electrical connectors are the most vulnerable points. Apply a thin bead of clear silicone sealant around each connector plug before re‑attaching. After the silicone cures (approximately 30 minutes), slide heat‑shrink tubing over the joint and apply gentle heat to create a watertight barrier. The silicone remains flexible, allowing the folding action to continue unhindered. This method offers superior protection compared with generic tape, which can peel under vibration.
Step 4: Protect the Battery Compartment
The battery is the most expensive component; safeguarding it yields the greatest return on investment. Apply waterproofing spray to the exterior of the battery case, focusing on seams and vent openings. Allow the spray to dry for the recommended 15 minutes. For added security, line the interior of the compartment with a thin silicone gasket cut to size. The Hiboy S2 includes a solid‑tire design and a robust double‑braking system, yet users have reported battery performance issues after exposure to rain. Implementing this gasket prevents moisture from reaching the cells.
Step 5: Seal Fold Joints and Hinges
Folding mechanisms are natural entry points for water. Apply a continuous silicone line along each hinge pin and the surrounding metal housing. Use a small brush to spread the sealant evenly, ensuring no gaps remain. The Roinside Electric Scooter advertises a one‑click folding system; however, its design does not include built‑in seals. Adding silicone restores water resistance while preserving the ease of folding.
Step 6: Install Weather‑Resistant Covers for Motor and Wheels
Dust and moisture can accumulate around the motor housing and wheel bearings. Wrap the motor with a breathable, water‑repellent cover made from neoprene or a similar material, securing it with Velcro straps. For the wheels, apply a thin layer of silicone spray to the spokes and hub to repel water without affecting rotation. The Segway Ninebot E2/E3 utilizes large tubeless tires and an elastomer suspension, yet its motor remains exposed. Adding a cover extends the motor’s service life and reduces maintenance frequency.
Step 7: Apply Protective Coating to the Frame
Corrosion on the aluminum or alloy frame can occur over time, especially in humid climates. Spray a light coat of anti‑rust, waterproofing paint on the entire frame, avoiding the wheels and brake discs. Allow each coat to dry for ten minutes before applying the next; two coats provide optimal protection. This coating works in conjunction with the silicone seals, delivering a comprehensive barrier against moisture.
Step 8: Test for Leaks and Perform Final Adjustments
After the sealants have fully cured (24 hours is recommended), the reader should conduct a leak test. Fill a shallow basin with water and place the scooter’s lower section inside, ensuring the battery compartment remains dry. Observe for any dripping or condensation for fifteen minutes. If moisture is detected, re‑apply silicone to the affected area. Finally, power on the scooter and verify that all electronic functions operate smoothly.
Tips & Pro Tips
- Work in a well‑ventilated area when using silicone sealant and waterproofing spray.
- Do not over‑apply silicone; excess material can interfere with the folding hinge.
- Store the scooter in a dry environment when not in use to prolong the protective coatings.
- Consider adding a removable silicone sleeve around the handlebar for extra rain protection.
- Regularly inspect the seals after every 3‑month period, especially after heavy rain.
Troubleshooting
| Problem | Possible Cause | Solution |
|---|---|---|
| Battery does not charge | Moisture entered the battery compartment | Remove the battery, dry thoroughly, and re‑apply silicone gasket. |
| Motor makes grinding noise | Water infiltrated motor bearings | Disassemble motor, dry bearings, and install neoprene cover. |
| Folding latch sticks | Excess silicone hardened | Gently clean latch with isopropyl cleaner and re‑apply a thin silicone line. |
Conclusion
The reader now possesses a systematic approach to waterproof a folding electric scooter, protecting valuable components and extending service life. By cleaning, sealing, and coating critical areas, the scooter becomes resilient against rain, puddles, and accidental splashes. Consistent maintenance and periodic inspections will ensure long‑term reliability. Implementing these steps empowers the commuter to enjoy year‑round mobility without fear of water damage.
Products Mentioned in This Guide
Frequently Asked Questions
Which components of a folding e‑scooter should be waterproofed?
Focus on the motor housing, battery case, wiring connectors, and any exposed electronics.
Can regular silicone sealant be used, or is a special type required?
A clear, high‑temperature silicone sealant works well; just ensure it’s rated for outdoor and electrical use.
How frequently should I reapply waterproofing spray?
Reapply every 6‑12 months or after heavy rain exposure to maintain optimal protection.
Will adding waterproofing materials affect the scooter’s performance or weight?
The added sealants and heat‑shrink tubing add negligible weight and do not impact motor efficiency.
Is it safe to ride through deep puddles after waterproofing the scooter?
Yes, as long as the waterproofing is properly applied and cured, the scooter can handle typical puddles, but avoid submerging it completely.