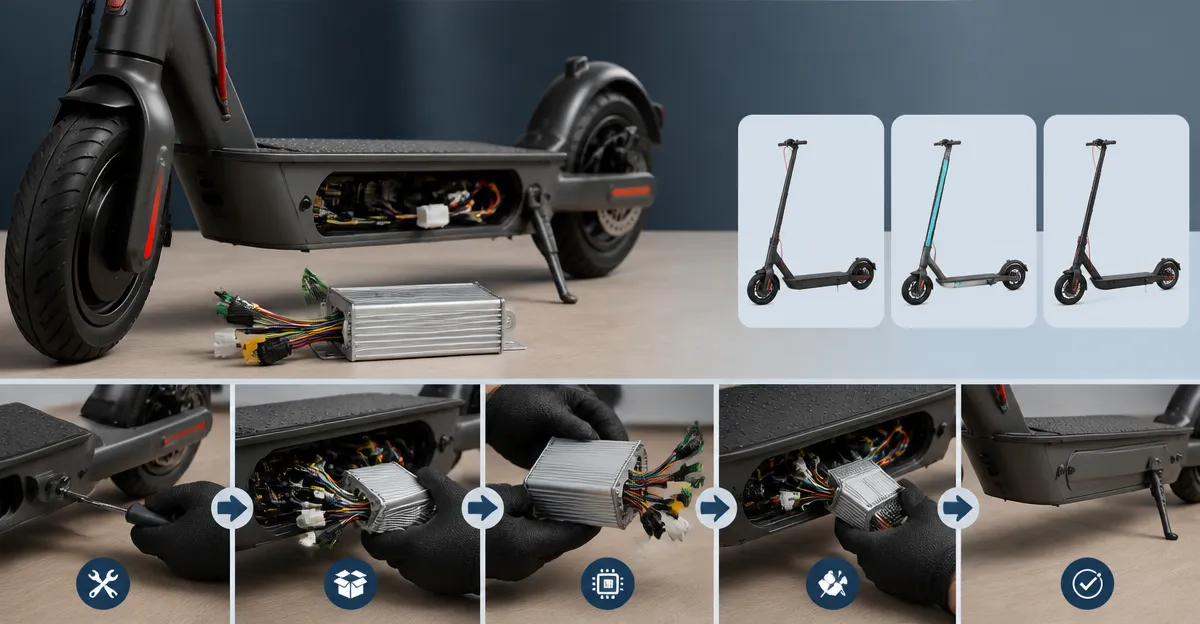
Introduction
This guide explains how to replace an electric scooter controller, a critical component that regulates motor power, speed and regenerative braking. One will understand the signs of a failing controller, the compatibility considerations for popular brands such as Ninebot, GoTrax and Hiboy, and the safest method to perform the replacement. The information is valuable because a malfunctioning controller can cause overheating, loss of power and permanent damage to the motor or battery. By following the procedures, one can extend the lifespan of the scooter and restore performance without professional service.
What You'll Need
- Replacement controller compatible with the scooter model (examples are listed in the Products Mentioned section).
- Metric Allen wrenches, needle‑nose pliers and a small screwdriver set.
- Electrical tape or heat‑shrink tubing for wire insulation.
- Soldering iron and solder, optional but recommended for secure connections.
- Smartphone with the Mi MiJia or Segway Ninebot app for post‑installation configuration.
- Protective gloves and safety glasses.
Step 1: Diagnose the Fault
Before removing any hardware, confirm that the controller is the source of the problem. Typical symptoms include intermittent power loss, a humming noise from the motor, reduced top speed, or the scooter failing to pair with the official app. One should also inspect the wiring for melted insulation, especially near the regenerative‑braking connector, as many users have reported this issue on Ninebot Max models. If the scooter powers on but the display remains blank, the controller board may be defective and require replacement.
Step 2: Power Down and Secure the Scooter
Disconnect the battery completely by removing the main power connector; this prevents accidental short circuits during the repair. Place the scooter on a stable work surface and secure the handlebars with a clamp or a friend to avoid movement. Wear protective gloves and safety glasses throughout the process. Verify that the battery indicator on the scooter is off before proceeding.
Step 3: Remove the Existing Controller
Locate the controller housing, which on Ninebot Max models is situated under the handlebar downtube and is secured with two small bolts. Using a metric Allen wrench, loosen and remove the bolts, then gently slide the controller out of the tube. Detach the wiring harness by pressing the release tabs on each connector; take note of the color‑coding (red, black, green, blue, yellow) for reassembly. If the connector includes a waterproof adhesive seal, cut it carefully to avoid damaging the pins.
Step 4: Choose a Compatible Replacement
The replacement must match the scooter's voltage, connector type and firmware compatibility. For a Segway Ninebot Max G30, the LEFELWEL Ninebot Max Controller offers an aluminum alloy shell for heat dissipation, waterproof connectors and compatibility with both the Mi MiJia and Segway Ninebot apps. Priced at $35.99 with a 4.2‑star rating from 112 reviews, it is a cost‑effective alternative to the original part. Another option is the Ninebot Max Scooter Controller from Yungeln Store, priced at $40.99 and rated 4.1 stars; it includes a 3‑capacitor design that some users find improves performance. Both controllers feature aluminum alloy housings and heat‑dissipating designs that reduce thermal overload.
Step 5: Install the New Controller
Position the new controller in the downtube, ensuring that the mounting holes align with the original bolt pattern. Secure the controller with the two bolts, tightening them to the manufacturer's torque specification (typically 2–3 Nm). Reconnect the wiring harness, matching each color to the corresponding pin; if the new board uses a slightly different pin layout, refer to the included manual for guidance. Apply electrical tape or heat‑shrink tubing to any exposed solder joints to prevent future short circuits. Finally, re‑attach the waterproof adhesive seal if the controller includes one.
Step 6: Verify Mechanical and Electrical Connections
Before re‑installing the battery, double‑check that all connectors are fully seated and that no stray wires are touching the metal frame. Use needle‑nose pliers to gently bend any protruding pins back into alignment. If the controller includes a brake switch, confirm that it is wired correctly; some kits, such as the Razor 24V Scooter Controller Kit, use a Normally Open brake switch, which may require a different wiring approach than the original scooter.
Step 7: Re‑Connect the Battery and Power Up
Re‑attach the main battery connector, ensuring that the XT60 power wires (red and black) are firmly seated. Turn on the scooter by pressing the power button; the display should illuminate within a few seconds. If the scooter does not power on, re‑inspect the connections for any loose pins or mis‑wired wires. Once power is confirmed, ride the scooter in a safe area to test acceleration, braking and top‑speed performance.
Step 8: Pair with the Official App
Open the Mi MiJia or Segway Ninebot app on a smartphone and follow the pairing instructions. The LEFELWEL Ninebot Max Dashboard is compatible with these apps and provides a digital display for speed, battery level and cruise control. Pairing may require resetting the controller to factory defaults; consult the user manual for the specific key‑press sequence. After successful pairing, configure any desired settings such as speed limits or regenerative braking strength.
Tips & Pro Tips
- Always work with the battery disconnected; even a low‑voltage charge can cause injury.
- When installing a controller with a waterproof connector, apply a thin layer of silicone sealant to the mating surfaces for extra protection.
- Use a multimeter to verify continuity on each wire before re‑assembly; this prevents hidden shorts that could damage the new controller.
- If the scooter feels slower after replacement, check that the firmware version matches the original; some controllers support custom firmware flashing for performance tuning.
- Store spare connectors and heat‑shrink tubing in a small zip‑lock bag for future repairs.
Troubleshooting
Problem: Scooter does not power on after installation.
Solution: Verify that the XT60 power wires are fully inserted and that the battery connector pins are not bent. Use needle‑nose pliers to gently adjust any misaligned pins.
Problem: Controller overheats during short rides.
Solution: Ensure that the aluminum alloy housing is not obstructed by debris and that the heat‑dissipating fins are clean. Consider adding a small fan or improving airflow by slightly loosening the surrounding cable ties.
Problem: Scooter fails to pair with the app.
Solution: Reset the controller to factory defaults by holding the power button for ten seconds, then repeat the pairing process. If the controller remains bound to a previous user, contact the seller for an unbinding code; the Ninebot ES Controller Board supplier offers unbinding assistance.
Conclusion
Replacing an e‑scooter controller requires careful diagnosis, proper tools and an understanding of compatibility across different brands. By following the eight steps outlined above, one can restore full functionality to a Ninebot, GoTrax or Hiboy scooter while minimizing the risk of further damage. The recommended products provide reliable heat dissipation, waterproof connectors and app compatibility, making the repair process smoother for both novices and experienced technicians. One should always test the scooter thoroughly after installation and keep spare parts on hand for future maintenance.
Products Mentioned in This Guide
Frequently Asked Questions
What are common signs that an electric scooter controller is failing?
Symptoms include overheating, sudden loss of power, inconsistent speed, and reduced regenerative braking.
Which tools are essential for replacing an e‑scooter controller?
You’ll need metric Allen wrenches, needle‑nose pliers, a small screwdriver set, and optionally a soldering iron with heat‑shrink tubing.
How do I ensure the replacement controller is compatible with my Ninebot, GoTrax, or Hiboy scooter?
Check the controller’s voltage, amperage, and connector type against the scooter’s specifications, often listed in the product manual or on the manufacturer’s website.
Is any software configuration required after installing a new controller?
Yes, use the Mi MiJia or Segway Ninebot app to calibrate throttle response and verify battery limits after the swap.
Can I replace the controller myself without professional help?
With the proper tools, safety gear, and a compatible replacement, most users can safely replace the controller by following step‑by‑step guides.