Introduction
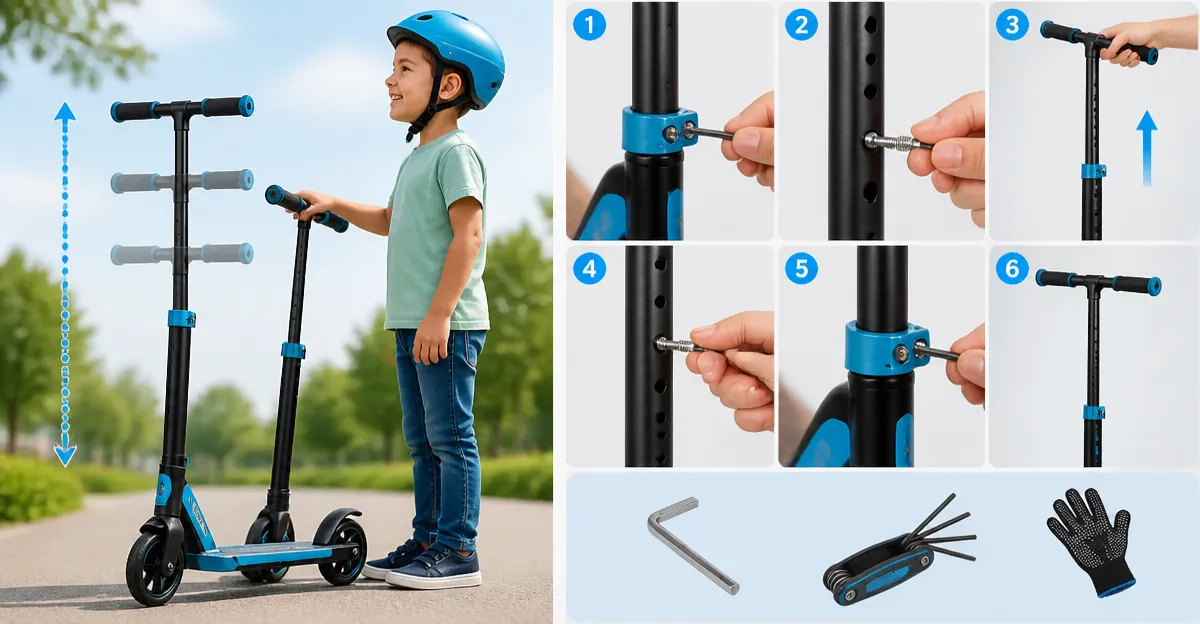
One of the most common maintenance tasks for a child's scooter is adjusting the stem height as the rider grows. Proper stem height ensures a comfortable riding posture, improves control, and reduces the risk of strain or injury. This guide explains how to adjust the stem on a variety of scooters, recommends reliable tools, and provides best‑practice advice for safe adjustments. Readers will gain confidence to perform the adjustment themselves, whether the scooter is a basic model or a premium adjustable‑height design.
What You’ll Need
- Allen wrench set (typically 4 mm or 5 mm) – most scooters use a hex socket to secure the stem.
- Adjustable wrench or pliers – for tightening the clamp bolt if the wrench does not fit.
- Cleaning cloth – to remove dust from the stem threads before re‑assembly.
- Nattork Foldable Kick Scooter – an example of a scooter with a quick‑folding stem that demonstrates the adjustment process.
- Razor A6 Extra-Tall Kick Scooter – a model with a tall, adjustable stem useful for taller children.
Step 1: Identify the Stem Type
The first step is to determine whether the scooter uses a clamp‑type stem or a thread‑in stem. A clamp‑type stem features a metal or plastic collar that tightens around the fork tube using a single bolt. A thread‑in stem screws directly into the fork tube and is secured with a set screw. Understanding the type influences which tool is required and how the adjustment is performed.
For example, the Nattork Foldable Kick Scooter employs a clamp‑type stem that can be loosened with a standard 5 mm Allen wrench. The Razor A6 Extra-Tall Kick Scooter also uses a clamp but offers a higher adjustment range, making it suitable for teenagers.
Inspect the stem area while the scooter is upright. Look for a visible bolt on the side of the stem collar; this is the adjustment point. If the stem appears to be threaded, you will locate a small set screw near the top of the stem.
Knowing the stem type prevents damage to the scooter and ensures the correct tool is selected for the next step.
Step 2: Loosen the Stem Clamp
Secure the scooter on a stable surface, such as a workbench or a low table, to prevent it from tipping. Insert the appropriate Allen wrench into the bolt head and turn counter‑clockwise until the clamp releases enough movement to slide the stem. If the bolt is recessed, an adjustable wrench may be needed to gain leverage.
During this step, the Nattork Foldable Kick Scooter demonstrates the ease of adjustment; its quick‑folding mechanism allows the clamp to be loosened in under ten seconds. The scooter is priced at $53.99, carries a rating of 4.6 out of 5 stars from 135 reviews, and supports riders up to 240 lb, making it a versatile option for families.
Apply steady pressure while turning the wrench; excessive force can strip the bolt head. If the bolt feels stuck, a small amount of penetrating oil can be applied and allowed to sit for a few minutes.
Once the clamp is loose, the stem should move freely up or down the fork tube.
Step 3: Adjust the Stem Height
Measure the rider’s appropriate handlebar height. A general guideline is that the handlebars should be at or slightly above the rider’s waist when standing upright. For younger children, the height may be lower to allow a slight bend in the elbows, while taller riders benefit from a higher position for better leverage.
Slide the stem up or down to the desired height. The Razor A6 Extra-Tall Kick Scooter offers an adjustment range from 32 inches to 42 inches, accommodating riders from 1.2 m to 1.9 m. Priced at $149.99 with a 4.8‑star rating from 2,624 reviews, this scooter provides a sturdy aluminum frame and anti‑rattle technology, ensuring the adjustment remains secure during vigorous use.
After positioning the stem, double‑check that the handlebars are aligned with the front wheel axis to maintain steering accuracy. Misalignment can cause uneven wear on the wheels and affect handling.
When the correct height is achieved, prepare to re‑tighten the clamp securely.
Step 4: Secure the Stem and Test the Adjustment
Using the same Allen wrench, turn the clamp bolt clockwise until it is snug. The torque should be firm but not overtightened; the bolt should resist further turning without stripping the threads. A good rule of thumb is to apply enough force that the stem does not shift when gentle pressure is applied to the handlebars.
For the Nattork Foldable Kick Scooter, the manufacturer recommends a one‑second quick‑fold after adjustment, indicating that the clamp mechanism is designed for rapid re‑assembly. Verify that the scooter folds and unfolds smoothly, confirming that the stem remains properly aligned.
Perform a short test ride on a flat surface. Have the rider stand on the deck, hold the handlebars, and push forward gently. Observe whether the steering feels stable and whether the rider maintains a comfortable posture. If any wobble or slipping occurs, re‑loosen the clamp and repeat the tightening process.
Document the final height setting for future reference; many scooters feature a small marking on the stem to indicate the adjustment position.
Step 5: Maintain the Stem Mechanism
Regular maintenance prolongs the life of the adjustment system. After each ride, wipe the stem and clamp area with a clean cloth to remove dust and moisture. Periodically inspect the bolt for signs of wear or corrosion, especially if the scooter is used in humid environments.
If the scooter includes a quick‑release lever, ensure that it fully engages before storage. The Nattork Foldable Kick Scooter features a one‑second fold mechanism that relies on a secure lock; any looseness can compromise safety.
For scooters with aluminum frames, such as the Razor A6 Extra-Tall Kick Scooter, avoid using harsh chemicals that could degrade the metal finish. A mild soap solution followed by a dry wipe is sufficient.
Schedule a full inspection every three months, especially if the scooter is used frequently or by multiple riders.
Tips & Pro Tips
- Measure the rider’s height before purchasing a scooter to ensure the adjustment range will accommodate future growth.
- When tightening the clamp, use a torque wrench set to 2‑3 Nm if available; this prevents over‑tightening while ensuring a secure fit.
- Keep a spare Allen wrench in the scooter’s storage bag; it is a small tool that can make a big difference during roadside adjustments.
- If the stem bolt is stripped, replace it with a manufacturer‑approved bolt rather than improvising with a larger size.
- Consider adding a protective rubber sleeve over the stem clamp to reduce wear on the fork tube.
Troubleshooting
Problem: Stem slips after adjustment.
Solution: Verify that the clamp bolt is tightened to the recommended torque. If the bolt is worn, replace it. Ensure the fork tube is clean and free of oil, as lubricants can reduce friction.
Problem: Handlebar wobble during riding.
Solution: Check that the stem is centered on the fork axis. Realign if necessary and re‑tighten the clamp. Inspect the headset bearings for wear; replace if they exhibit excessive play.
Problem: Difficulty loosening the clamp bolt.
p>Solution: Apply a penetrating oil such as WD‑40, wait five minutes, and attempt again. Use a longer wrench for additional leverage, but avoid excessive force that could strip the head.Conclusion
Adjusting the stem height on a kid’s scooter is a straightforward process that enhances comfort, safety, and performance as the rider grows. By identifying the stem type, loosening the clamp, setting the correct height, securing the mechanism, and performing regular maintenance, one can ensure a reliable riding experience. The recommended scooters – the Nattork Foldable Kick Scooter and the Razor A6 Extra-Tall Kick Scooter – provide robust adjustment features that simplify the process for parents and caregivers. Implement the tips and troubleshooting advice to address common issues, and enjoy many safe rides ahead.
Products Mentioned in This Guide
Frequently Asked Questions
How do I know which Allen wrench size to use for my scooter’s stem?
Check the stem’s bolt head; most kids scooters use a 4 mm or 5 mm Allen wrench, which is usually listed in the user manual.
Can I adjust the stem height without removing the wheels?
Yes, most adjustable‑height scooters let you loosen the clamp bolt, slide the stem, then retighten without taking off the wheels.
What safety steps should I follow when adjusting the stem?
Secure the scooter on a flat surface, wear gloves, tighten the bolt to the manufacturer’s torque spec, and test ride at low speed before full use.
How often should I clean the stem threads during adjustments?
Wipe the threads with a clean cloth each time you adjust to prevent dust buildup that can cause slipping or wear.
Is it safe to use pliers instead of an Allen wrench for the clamp bolt?
Pliers can be used if the wrench doesn’t fit, but avoid over‑tightening to prevent stripping the hex socket.