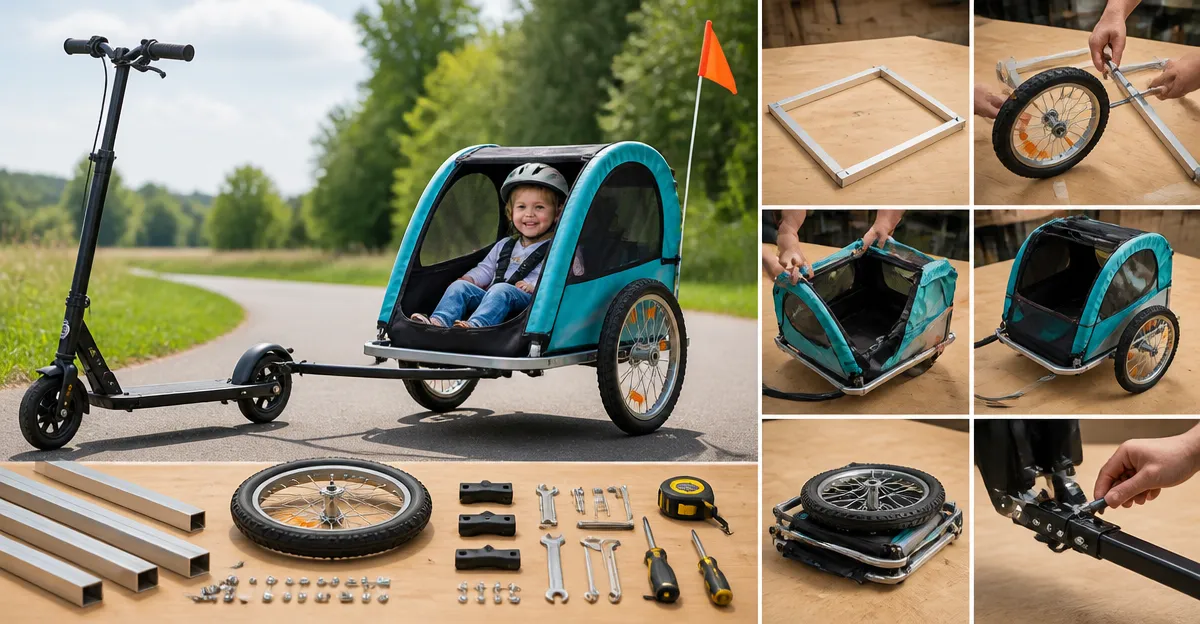
How to Build a DIY Folding Scooter Trailer for Kids: Easy Step-by-Step Plans
Introduction
The reader will learn how to design, construct, and finish a lightweight folding trailer that can be attached to a standard kick scooter. This guide explains each phase of the project, from planning the dimensions to testing the final product. One will discover why a folding trailer is valuable for families that need portable cargo capacity while keeping a child safe during rides. By following the instructions, the reader can create a durable solution without spending a fortune on commercial alternatives.
What You'll Need
The following materials and tools are recommended for the build. Each item is linked to a reputable Amazon product that can simplify the process. The guide also notes why the product is advantageous compared with generic alternatives.
- Steel tubing with anti‑rust powder coating – similar to the frame used in the PEXMOR Bike Cargo Trailer. The coating prevents corrosion and the tube diameter provides sufficient strength for a 90 kg load.
- Two 16‑inch air‑filled wheels – the same size as the wheels on the PEXMOR model, offering a smooth ride and easy replacement.
- Universal bike hitch connector – the hitch from the PEXMOR trailer can be repurposed for a scooter attachment, allowing quick plug‑and‑play connection.
- Five‑point child safety harness – the harness system from the Instep Single Bike Child Trailer provides certified restraint for a child up to 40 lb.
- Reflectors and safety flag – integrated reflectors from the PEXMOR trailer increase visibility in low‑light conditions.
- Folding hinges and latch hardware – heavy‑duty hinges enable the frame to collapse for storage.
- Basic hand tools (drill, wrench set, screwdriver, metal saw) – required for cutting, drilling, and assembling the frame.
Step 1: Design and Planning
Begin by sketching the trailer dimensions. A common footprint for a scooter trailer is 30 inches long, 18 inches wide, and 12 inches high, which provides enough cargo space for a child seat and a small storage bin. One should incorporate a folding joint at the midpoint of the longitudinal tubes, mirroring the foldable design of the PEXMOR Bike Cargo Trailer. The PEXMOR trailer demonstrates how a removable front and back frame combined with a side‑folding mechanism can reduce the packed size by half. By adopting this concept, the DIY trailer will be easy to store in a car trunk or garage.
Next, calculate the load capacity. The steel tube and reinforced polyethylene bottom of the PEXMOR trailer support up to 90 kg, which is more than sufficient for a child and a few grocery bags. Designing the frame to match this capacity ensures structural integrity without over‑engineering.
Step 2: Gather Materials and Tools
Purchase the steel tubing, wheels, and hinge hardware from a local metal supplier or online retailer. For the safety harness, the Instep Single Bike Child Trailer includes a five‑point harness, a bug‑screen canopy, and a weather shield. The Instep harness is rated 4.6 out of 5 stars by 2,992 reviewers and costs $119.99, making it a reliable and affordable safety component. Its quick‑release buckles simplify daily installation and removal.
Collect the universal hitch from the PEXMOR trailer (price $77.99, rating 4.2/5 from 240 reviews). This hitch attaches to the rear axle of most bicycles and can be adapted to a scooter’s rear axle with a short metal adapter plate. The adapter plate can be fabricated from a 1‑inch steel plate using a metal saw.
Step 3: Build the Frame
Cut four pieces of steel tube to the desired length (30 inches) for the longitudinal members. Cut two shorter pieces (18 inches) for the crossbars. Drill holes at each intersection and bolt the crossbars to the longitudinal tubes using stainless‑steel carriage bolts. This creates a rectangular chassis similar to the PEXMOR trailer’s sturdy frame.
Attach the folding hinges at the midpoint of each longitudinal tube. The hinges should allow the front half of the frame to swing upward, replicating the foldable feature of the PEXMOR model. Secure the hinges with the supplied latch hardware to prevent accidental opening while riding.
Step 4: Install Wheels and Axles
Mount the two 16‑inch air‑filled wheels onto the rear axle brackets. The wheels from the PEXMOR trailer are designed for smooth rolling on mixed terrain and include reflective sidewalls for added safety. Ensure the axle is centered to maintain balance when the trailer is loaded.
Fit the universal hitch onto the axle. The PEXMOR hitch uses a plug‑in pin that can be inserted into a matching socket on the scooter’s rear axle. This quick‑connect system allows the trailer to be attached or detached in seconds, a feature that is valuable for commuters who need to transition between scooter and foot travel.
Step 5: Add Folding Mechanism
Secure the latch mechanism on the folding hinges. When the latch is released, the front half of the frame folds upward, reducing the overall length to approximately 18 inches. This compact profile fits easily into a standard car trunk, similar to the storage convenience advertised for the PEXMOR trailer.
Test the hinge operation by folding and unfolding the frame several times. Lubricate the hinge pins with a light oil to ensure smooth motion and to prevent squeaking during use.
Step 6: Install Safety Features
Attach the five‑point harness from the Instep Single Bike Child Trailer to the interior of the cargo area. The harness includes padded straps and a quick‑release buckles, providing both comfort and rapid evacuation if necessary. The Instep harness is rated highly for durability and ease of use.
Mount the reflectors from the PEXMOR trailer on the front, rear, and sides of the frame. The red and yellow reflectors increase visibility during dusk or night rides. Additionally, attach the safety flag supplied with the Instep trailer to the rear of the frame for extra conspicuity.
Install a weather‑proof canopy using a lightweight fabric similar to the one on the Schwinn Trailblazer Plus Kids Bike Trailer. The Trailblazer Plus canopy provides a bug screen and weather shield, protecting the child from sun, rain, and insects. Its price is $169.99 and it holds a 4.8/5 rating from 886 reviewers, indicating strong consumer satisfaction.
Step 7: Test and Adjust
Place a weight equivalent to the intended load (e.g., a child doll of 30 lb) inside the trailer and attach the trailer to the scooter. Ride on a smooth surface and observe the handling. Check for wobble, excessive drag, or misalignment of the wheels. Adjust the axle brackets if necessary to achieve proper alignment.
Verify that the folding latch remains secure during motion. If the latch shows signs of loosening, tighten the set screws or replace the latch with a higher‑grade stainless‑steel version.
Tips & Pro Tips
- Use a torque wrench to tighten all bolts to the manufacturer's specifications; over‑tightening can strip threads.
- Apply anti‑rust spray to all steel components after assembly to extend the trailer's lifespan.
- Check tire pressure before each ride; under‑inflated tires increase rolling resistance and wear.
- When installing the universal hitch, ensure the pin is fully seated to avoid accidental disengagement.
- Consider adding a small LED light strip to the rear for enhanced night‑time visibility.
Troubleshooting
| Problem | Possible Cause | Solution |
|---|---|---|
| Trailer wobbles side‑to‑side | Wheel axle not centered | Loosen axle bolts, realign wheels, and retighten. |
| Hinge sticks when folding | Insufficient lubrication | Apply a few drops of light oil to hinge pins. |
| Harness straps loosen during ride | Improper tightening | Re‑adjust straps and use the quick‑release buckles to secure. |
Conclusion
The reader now possesses a complete set of instructions to build a functional, foldable scooter trailer for children. By utilizing high‑quality components such as the steel frame of the PEXMOR Bike Cargo Trailer, the safety harness from the Instep Single Bike Child Trailer, and the canopy of the Schwinn Trailblazer Plus Kids Bike Trailer, one can ensure durability, safety, and convenience. The guide emphasizes that the project can be completed without mandatory purchases, yet the recommended products simplify the process and enhance the final result. One is encouraged to enjoy the newly built trailer on family outings, grocery trips, or weekend adventures.
Products Mentioned in This Guide
Frequently Asked Questions
What materials are required to build a DIY folding scooter trailer?
You need powder‑coated steel tubing, a hitch bracket, plywood or plastic decking, wheels, bolts, and basic hand tools such as a drill and wrench.
How is the trailer attached to a standard kick scooter?
A universal hitch clamp bolts onto the scooter’s rear axle, then a quick‑release pin secures the trailer’s drawbar to the clamp.
Is the DIY trailer safe for a child weighing up to 90 kg?
Yes, when built with the recommended steel tubing diameter and proper welding, the frame can safely support up to 90 kg.
Can the trailer be folded for storage or transport?
The design includes hinged side panels and a collapsible frame, allowing the trailer to fold flat in under a minute.
How does the cost of a DIY trailer compare to buying a commercial one?
A DIY build typically costs 40‑60% less than a ready‑made cargo trailer, depending on material choices and tool availability.